


|
| Copyright © 2006 Marc Elieson |
|
On this page I will explain the filtering setup for my 135-gallon show tank. This setup was designed for effectiveness and ease of maintenance. I use a combination of Wet/Dry and sponge filters to employ mechanical, chemical, and biological filtration. After more than two years of using this setup, I continue to be very pleased with the results.
|
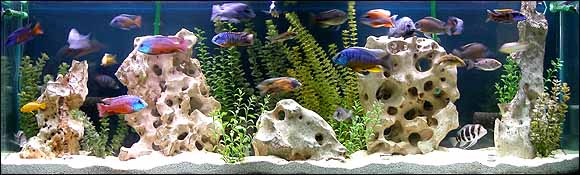 |
The majority of filtration is carried out by my Wet/Dry filter, which sits under the tank within the stand. I use an overflow box to get the water from the tank to the filter and then an external pump to return the water to the tank. My overflow box is MarineLands Silent Overflow Skimmer (S.O.S.), which is much QUIETER than other commercial overflow boxes; however, it still makes some noise despite the claim its name makes. Before using the S.O.S., the overflow box I had made a horrendous gurgling sound that could be heard all over the house. Since purchasing the S.O.S., Ive discovered that a perfectly quiet overflow box can be constructed using the Durso Standpipe design. I used the Durso Standpipe design for my 75-gallon tank, which has proven to be absolutely silent and inexpensive. One day, when I get some time, Ill eventually replace my S.O.S. with a homemade overflow box using this design. |
The S.O.S., like most overflow boxes, has two compartments - an inner and outer box, permitting the passage of water from the tank without having to drill a hole in the tank.
The overflow skimmer box "skims" water off the top of the aquarium. By pulling the water from the surface, you prevent the natural formation of a protein film on the surface of the water. It forms by the accumulation of organic materials and protein-based wastes in the tank, which are "surface active," meaning they are attracted to the surface of the water. This protein film can be harmful to your fish because it prevents proper gas exchange, effectively reducing the amount of oxygen in the water. |
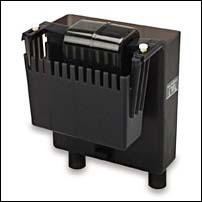 |
The S.O.S. and most overflow boxes are fitted with a prefilter of some sort. Mine has a floss prefilter pad, which catches most of the debris in the water on its way to the Wet/Dry filter. This floss pad is easily removed and the junk that gets caught here can be rinsed off under the tap or with a garden hose.
Water enters the interior skimmer/prefilter box and then gets siphoned to an outside overflow box. From there it enters the overflow tube, and with the aid of gravity, the water drops down to the Wet/Dry filter below the tank. There are many different Wet/Dry filters on the market, but I found MarineLands Tidepool to be by far superior. There are two models. The Tidepool I is designed for 40 to 80 gallon systems while the Tidepool II is rated for 80 to 200 gallon tanks. I use the Tidepool II, which is 26" L x 13" W x 16½" H. |
When the water reaches the Tidepool, it first passes through three slide-out media trays. In the first tray, I have another floss pad, designed to catch any large debris. This is acts as a safeguard in case anything gets past the overflow box. Notwithstanding, Ive never discovered any debris or waste in this tray. In the two subsequent trays, I have biological filter pads, with activated carbon. The sponges act as biological filters and also capture and sequester any organic wastes that would otherwise accumulate on the waters surface back in the tank. The carbon acts as my chemical filter, removing any toxic chemicals in the water. I service the media trays once a month, rinsing the sponges and replacing the carbon.
|
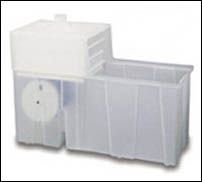 |
From the media trays, the water drops onto a large Bio-Wheel, which houses the majority of my nitrifying bacteria. The Bio-Wheel immediately removes any nitrite and ammonia in the water.
Wet/Dry filters are named such because there are components of the filters two components. The "wet" portion of the filter is the bottom half, which is submerged. The "dry" portion of the filter is not necessarily dry, but it isnt submerged either. In the Tidepool, the dry portion would be the three media trays. These filters are also referred to as trickle filters because the water trickles through a filtering media (bio-balls, floss, or media trays). This trickling effect aerates the water, which is especially important for your aerobic (oxygen-dependent) nitrifying and denitrifying bacteria, which convert the ammonia to nitrite and from nitrite to nitrate. Your fish also depend upon the oxygen. |
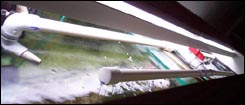
The Bio-Wheel is at the interface of the wet and dry components, continuously rotating from the submerged portion to the open air, where it gets doused with incoming water. By rotating, it allows the bacteria to receive needed oxygen. The water dropping from the above media trays is what causes the Bio-Wheel to spin, just the water wheel of a mill. As shown here, I've added a safety overflow hazard, which will keep my floor dry if ever the electricity were to fail. |
 |
One adaptation that Ive made to my Tidepool was to create a lid out of Plexiglas. I found that as the biological filter pads in the media trays get old, the water doesnt pass through them as well. Consequently, the water spills over the sides of the trays, which would splash on the inside of my stand. By having a lid over the top of the Tidepool, the water stays in.
|
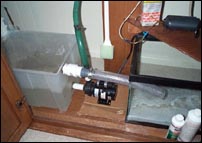
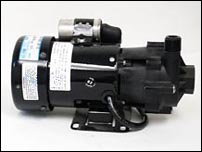
After the water has been filtered and aerated, it is returned to the tank by my external pump. Again, there are many different options here. I chose to go with a Gorman Rupp Industries pump (GRI 510). It is rated at 570 gallons per hour (gph) at 6 feet of head. At 102 watts, it is extremely energy efficient. It is VERY quiet, self-priming, and can even run dry for up to 8 hours.
If you plan to use an external pump, the side a bulkhead must be installed in the side of the Tidepool. Alternatively, a submersible pump can placed inside the Tidepool. |
 |
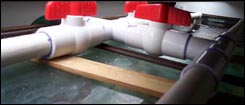
The external pump is connected to flexible tubing heading back to the tank. At the top of the tank, the flexible tubing is connected to PVC via a barb. The PVC returns the water to the tank by several means, both below the surface of the water and above. The PVC pipe was constructed of three pipes, each isolatable by a turn valve. Two of the bars return the water below the surface of the water in the back corners of the tank. These return jets are angled towards the front-center of the tank. These help keep the water at the top of the tank circulating. The third bar runs the length of the tank, along the front. It is has been perforated to create a shower, which further aerates the water by agitating the surface. The holes were drilled such that the shower is angled towards the back of the tank. The shower makes a relaxing, fountain-like sound, but if you get tired of it, you can always turn it off with the turn of a valve. As you can see on the right, the water returning from any of these routes can be shut off with the turn of a valve.
|
 |
 |
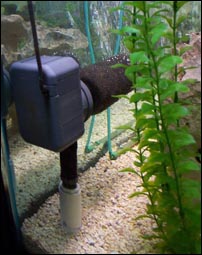
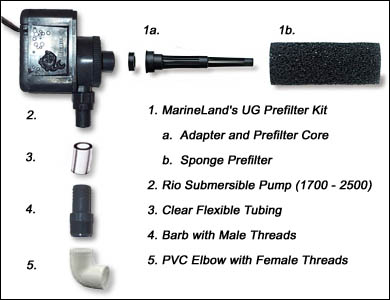
Within the tank itself, I have even more biological filtration. In the two back corners of my tank, I have placed a Rio 1700 submersible pump. Attached to the intakes of these pumps are sponge filters. These particular sponges are an adaptation of my own being that they are advertised as sponges for MarineLands Reverse Flow undergravel filtering system. These sponges grab any and all uneaten food, fecal matter, and other wastes that float around in the bottom half of the tank. |
The outlets for the submersible pumps are then attached to PVC pipes, buried in the gravel. These pipes redirect the water through out the tank, creating a noticeable current along the bottom. In the picture to the left, you can see the PVC pipes exiting the gravel, angled upward. I pinched these so that the flow out is stronger than it would otherwise be. The idea behind having these "jets" blowing upward helps to keep food and fecal waste off the gravel. So, instead of having to spend my time vacuuming the gravel, all I have to do is remove the sponges, wring them out under the tap, and replace them. You would be surprised at how full these sponges get! Just to illustrate the effectiveness of my undergravel jet system, I recently vacuumed my gravel for the first time in over 6 months, only to find that the Python did not pull up ANY wastes! If you are interested in building your own undergravel jets, take a look at my article on Water Movement In The Tank. |
 |
In addition to all of my pumps and filters, I have several bubble wands interconnected along the back of my tank. These further aerate the water, but more importantly, they serve to create an overall rising current in the tank. The upward current produced by the bubbles and the undergravel jets help to keep things circulating and off the bottom.
|
My setup works quite the opposite of an undergravel filter; I try to keep waste products off the bottom. Wastes and debris either get caught on my sponge prefilters in the tank, or sucked out the top (via the overflow box) where they get caught in the various filter pads of the Tidepool. This makes maintenance much less of a chore. Instead of having to tediously clean the gravel, I just remove and rinse the sponges and filter pads and replace them. There is no need to replace the pads unless they get torn. The diagram to the right explains how to assemble the Rio to the PVC and the sponge prefilters (click on it to enlarge it). |
 |
In this tank, I use CaribSeas aragonite for substrate. It is a gravel made from crushed coral, but the pieces are so small that any smaller and they would be considered sand grains. Crushed coral offers further biological filtration for a fish tank because its porous, meaning that bacteria will colonize in these pores, thus allowing for the establishment of larger numbers of bacteria. Aragonite claims that it permits an increase in a tanks bio-load by up to 50%.
|
African Cichlids prefer hard, alkaline water (pH 8.0 - 9.0). My tap water is already alkaline and very hard, and therefore, I don't have to add any buffering salts to get a desirable pH. Nonetheless, I use the aragonite as substrate and limestone for decoration (both of which would help alkalinize and buffer an otherwise more acidic tank). By using aragonite or crushed coral, you can eliminate chronic pH problems. Aragonite further claims to provide 25 times the buffering power of other crushed corals, probably due to the smaller size of its particles, and hence increased surface area. |
 |
Before you add crushed coral or aragonite to any tank, it is important to rinse any sand or debris from it. If crushed coral is not properly rinsed before adding it to a tank, it will turn the water to milk! Many people will contend that even after it has been rinsed a hundred times (literally) it will still cloud a tank. Notwithstanding, I have had great success by rinsing it just a few times in a 5-gallon bucket with a garden hose. Then when I add it to the tank, I slowly drip the water into the tank in one corner or against the glass, being very careful not to the agitate the gravel. Sometimes it will still be a little cloudy (but not milky). In which case Ill drain it and then fill it up again and without fail it is always clear the second time. In any event, it will clear up within a few days.
The rocks in my tank are honeycomb limestone (a.k.a. Texas Holey Rock). I discuss these in some detail in a separate article: My Rocks. If you want to read more about plumbing, overflow boxes, sumps, etc., take a look at the article on Plumbing FAQ. |
|
All contents of this web site are Copyright © 2000-2016 Marc Elieson |